Empty Rectangle
expertThe Empty Rectangle strategy is useful when a candidate within a specific box is restricted to a single row and column. It helps locate digit eliminations, regardless of its exact placement of the candidate within the box.
Empty Rectangle is an advanced Sudoku strategy that arises when the candidates for a specific digit within a box are confined to a single row and a single column.
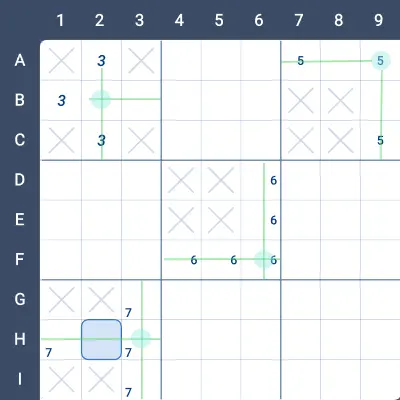
In the image below, each of the four boxes demonstrates a potential Empty Rectangle setup for a different digit.
- The green lines indicate the row and column where the digit can appear.
- The light blue circle marks the intersection of this row and column.
- The X’s within each box show the cells where the digit cannot be placed.
The term Empty Rectangle refers to the rectangle formed by the X’s, which is “empty” of the digit in question.
- In Box 1, the digit 3 can only be in Row B or Column 2.
- In Box 3, the digit 5 is limited to Row 1 or Column 9.
- In Box 5, the digit 6 can only be in Row F or Column 6.
- In Box 7, the digit 7 is restricted to Row H or Column 3.
This marks the first step in identifying an Empty Rectangle. Next, we’ll explore how to apply this setup to solve the puzzle.
The general idea behind Empty Rectangle is that once a digit is confined to a specific row and column within a box, we can trace its influence along that row and column to identify potential rule violations. Specifically, the intersection cell must see a strong link of the digit. Using this information, we can draw a rectangle where:
- One corner of the rectangle is the intersection cell in the box.
- The diagonal extends to the far side of the strong link.
While this document focuses on the general case, it’s worth noting that longer chains can also be followed to make elimination decisions.
Example: Empty Rectangle on 3 in Box 1
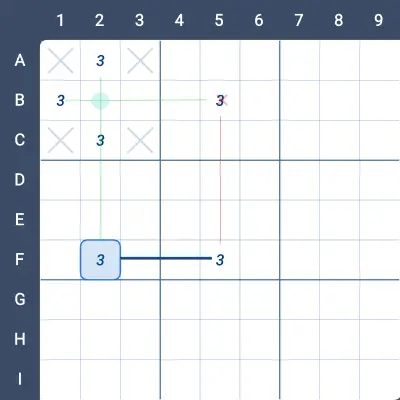
In the image below, we observe an Empty Rectangle for the digit 3 in *Box 1.
- The intersection cell is B2, and it sees a strong link of 3 between the cells F3 and F5.
- Using this setup, we can draw a rectangle with corners at B2, F2, F5, and B5.
Now, let’s consider the candidate 3 in *B5:
- If the 3 in Box 1 is placed in Row B, there cannot be a 3 in B5.
- Alternatively, if the 3 in Box 1 is in Column 2, then F2 ≠ 3, forcing F5 = 3 (due to the strong link). Once again, this eliminates 3 from B5.
Thus, regardless of the placement of 3 in Box 1, there cannot be a 3 in B5.
Let’s explore additional examples to further illustrate this strategy.
Example 1:
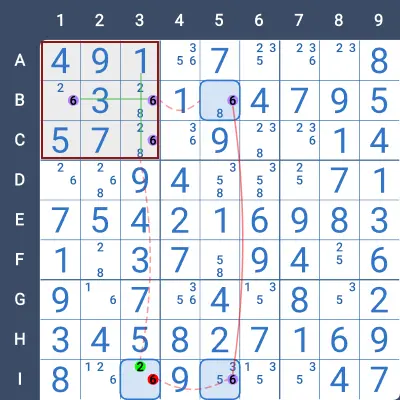
In the image below, the 6’s in Box 1 are restricted to either Row B or Column 3. The intersection point is B3, which sees a strong link of 6 starting at B5.
- B5 and I5 form a strong link of 6 in Column 5.
- This setup defines a rectangle with corners at B3, B5, I5, and I3.
- There is a 6 in I3, which can be eliminated.
Why can the 6 in I3 be eliminated?
- If the 6 in Box 1 is placed in Column 3, then there cannot be a 6 in I3.
- Alternatively, if the 6 in Box 1 is placed in Row B, then B5 ≠ 6, forcing I5 = 6 (due to the strong link). Once again, this eliminates 6 from I3.
Therefore, in either case, I3 ≠ 6.
Example 2
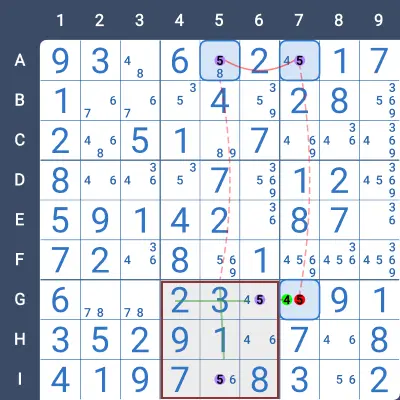
This is an intriguing example. In the shaded Box 8 shown in the image below, there are two distinct potential setups for an Empty Rectangle:
- In the first setup (used in this example), the digit 5 can be in either Row 7 or Column 5.
- In the second potential setup, 5 can be in either Column 6 or Row 9.
Take a moment to examine the image and consider why Column 6 and Row 9 are also valid potential setups.
Continuing with the First Setup
Let’s focus on the first row and column:
- If 5 is in Row 7, then G7 ≠ 5.
- If 5 is in Column 5, then A5 ≠ 5, forcing A7 = 5. Consequently, G7 ≠ 5.
In both cases, the candidate 5 in G7 can be eliminated.
Practise this strategy with built-in step-by-step hints inside our apps.