Hidden Unique Rectangle
expertThe Hidden Unique Rectangle strategy ensures the puzzle has only one solution by eliminating possibilities that would create a Deadly Rectangle, which could result in multiple solutions. When four cells in two boxes, two rows, and two columns share the same two candidates, it creates the risk of a Deadly Rectangle. To avoid this, one of these cells must have a different digit as its solution.
Hidden Unique Rectangle is an advanced strategy that relies on the fact that a Sudoku board must have a single unique solution. When a Deadly Rectangle exists on the board, it means that the board has more than one solution. In the Hidden Unique Rectangle, we make a decision knowing that the board cannot have more than one solution and, therefore, cannot have a Deadly Rectangle.
Minimum Requirements for a Hidden Unique Rectangle Setup:
- Four cells with two candidates, a and b, that have the potential to form a Deadly Rectangle.
- A minimum of two Strong Links on either a or b in the four cells.
- At least one of the four cells must contain only the two candidates, a and b. In many cases, a decision with only one cell having 2 candidates is not possible, and two cells with 2 candidates are required.
The image below shows a potential Hidden Unique Rectangle setup. The four highlighted cells contain only the candidates a and b. They are positioned across two rows, two columns, and two boxes. If a and b are the only possible solutions in all four cells, it will create a Deadly Rectangle. There are 2 Strong Links on digit a—one in row C and one in Column 4. Additionally, cell G6 contains only a and b as candidates, matching the minimal setup definition of a Hidden Unique Rectangle outlined above.
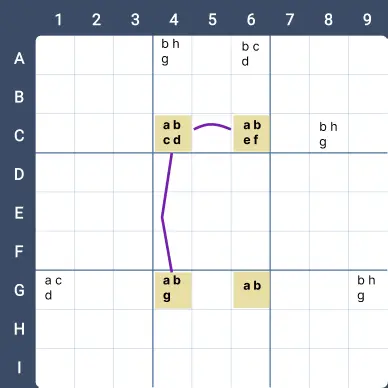
Once we have this setup, we can check whether we can make smart eliminations. The elimination involves removing the digit that doesn’t have strong links and is from one of the cells with more than two candidates. Typically, the elimination occurs from the cell opposite the one with only two candidates, but it doesn’t always have to be that way. The best approach to finding the elimination is by attempting to place b in one of the cells with more than two candidates and observing whether it generates a Deadly Rectangle situation. If it does, this means that b cannot be in that cell.
Let’s examine the image above
If C4 = b, then:
- C6 = a (due to strong links),
- G4 = a (due to strong links),
- G6 = b.
This situation creates a Deadly Rectangle, which would also allow C4 = a, C6 = b, G4 = b, and G6 = a as a valid solution to the board. Since the board must have a single unique solution, b can be eliminated from C4.
Let’s now look at a few practical examples.
Example 1
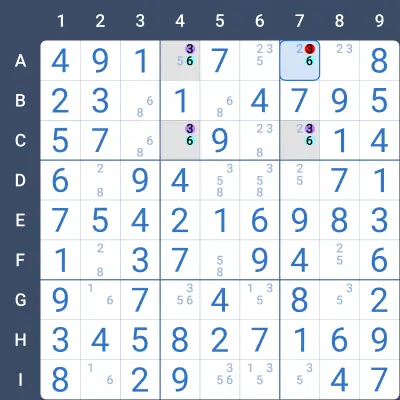
The image below shows a Hidden Unique Rectangle setup:
- A4, A7, C4, and C7 have a Deadly Rectangle potential for the digits 3 and 6.
- Two Strong Links for the digit 6: (A4, A7) and (A7, C7).
- One cell contains only 3 and 6 as candidates: C4.
Elimination Process:
If A7 = 3, then:
- C7 = 6
- A4 = 6
- C4 = 3
This creates a Deadly Rectangle situation, since if we swap the digits 6 and 3 in each of the cells, we would get another valid solution. Therefore, since the board must have a unique solution, A7 cannot be 3.
Please note that if we start assuming a cell other than A7 is 3, we wouldn’t be able to make a smart decision, as we would be left with cells that still have multiple candidates.
Example 2
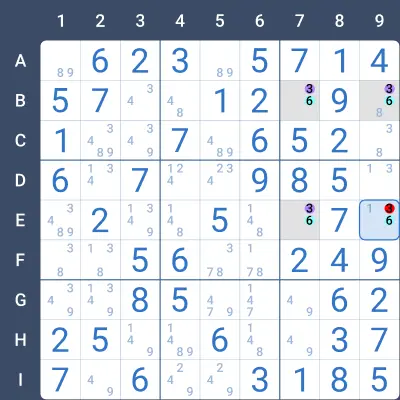
The following is another Hidden Unique Rectangle setup for the digits 2 and 5. This time, the setup includes two cells with only two candidates.
Setup Details:
- Deadly Rectangle potential in C7, C9, I7, and I9.
- Two Strong Links for the digit 5: (C9, I9) and (C7, I9).
- Two cells containing only 2 and 5 as candidates: I7 and I9.
Elimination Process:
If you try placing 2 in C7, you’ll notice that all four cells must contain only 2 and 5, creating a Deadly Rectangle situation. Therefore, 2 can be eliminated from C7.
Please note that if you start by placing 2 in C9, you won’t be able to reach a decision, because C7 will still contain multiple candidates. It’s important to choose the right cell to place the digit, and this is always a cell with more than two candidates.

Example 3
The following example meets the basic requirements of Hidden Unique Rectangle (HUR) for the digits 4 and 6 as well. However, unlike the previous examples, it has 3 Strong Links on 6.
With 3 or 4 Strong Links, most of the time, more than one elimination can be made.
- The 3 in E9 can be eliminated (please ensure you understand the reasoning by attempting to place 3 in E9).
- Additionally, the 3 in B9 can also be eliminated. If B9 = 3, then:
- E9 = 6
- B7 = 6
- E7 = 3
This creates a Deadly Rectangle situation, and 3 can be eliminated from B9.
Practise this strategy with built-in step-by-step hints inside our apps.